
You want the warning in your post to stand out, or the headings to use your brand color. You search, everything points at CSS, and that is where it stops. This is the single most common place blog customization stalls.
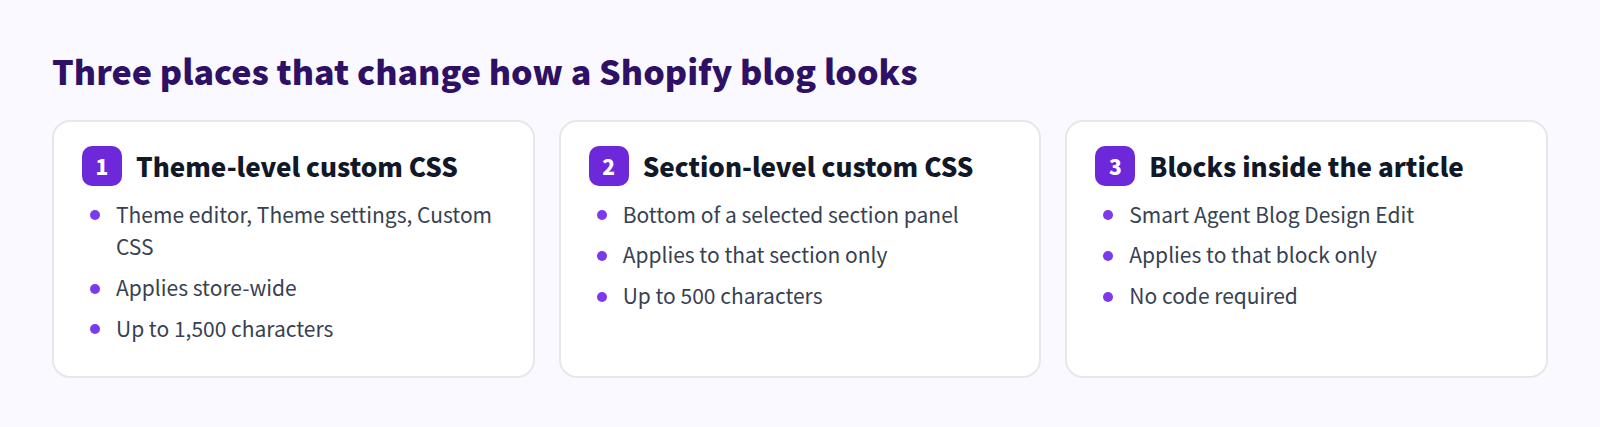
The short version: there are three places where CSS affects a Shopify blog post, two of them are built into Shopify, and the amount you can change without writing a line of code is larger than most people expect. This guide covers what Shopify's own custom CSS does — including the character limits and the rules it rejects — and then what your options are if you do not write CSS at all.
- The three places CSS can affect a Shopify blog post, and how far each one reaches
- The real limits on theme-level and section-level custom CSS
- How to change the look without writing CSS
- The difference between Design Edit and custom blocks in Smart Agent Blog
- Where to stop doing it yourself and hand it to a developer
People reach for CSS in the same four situations
We reviewed the blogs of 110 Shopify stores in Japan in August and September 2026 while preparing Smart Agent Blog proposals. Of the 78 posts where we recorded heading use, 27 (about 35%) had no headings at all, and several long posts with 13 to 16 headings had no table of contents.
Presentation gets skipped not because nobody cares, but because the fix is unclear. In practice the requests boil down to four:
- Put a warning in a visible box
- Match heading color or rules to the brand
- Make body text bigger or less cramped
- Stop images overflowing sideways on a phone
The third and fourth are almost always theme settings, not CSS. Separating those out first saves a lot of time.
What Shopify gives you on its own
Working from the outside in.
Start with theme settings, no code involved
Open Online Store → Themes → Customize, then Theme settings. Colors, typography (typeface and size), layout (page width and section spacing), animations, and the look of buttons, cards and badges all live here.
Most "the text is too small" and "the lines are too tight" complaints end here. Check this before writing any CSS. Overriding a theme setting with CSS means the next person who opens the settings panel will not understand why their change does nothing.
Theme-level custom CSS
Inside Theme settings there is a Custom CSS field, present when your theme includes a custom CSS section. Anything you put there applies across the store.
Section-level custom CSS
Select a section in the theme editor and a second Custom CSS field appears at the bottom of the settings panel. This one only affects that section — select the blog post section and your rules stay on article pages.
The limits Shopify puts on custom CSS
These are worth knowing before you start. Shopify's Help Center states them explicitly.
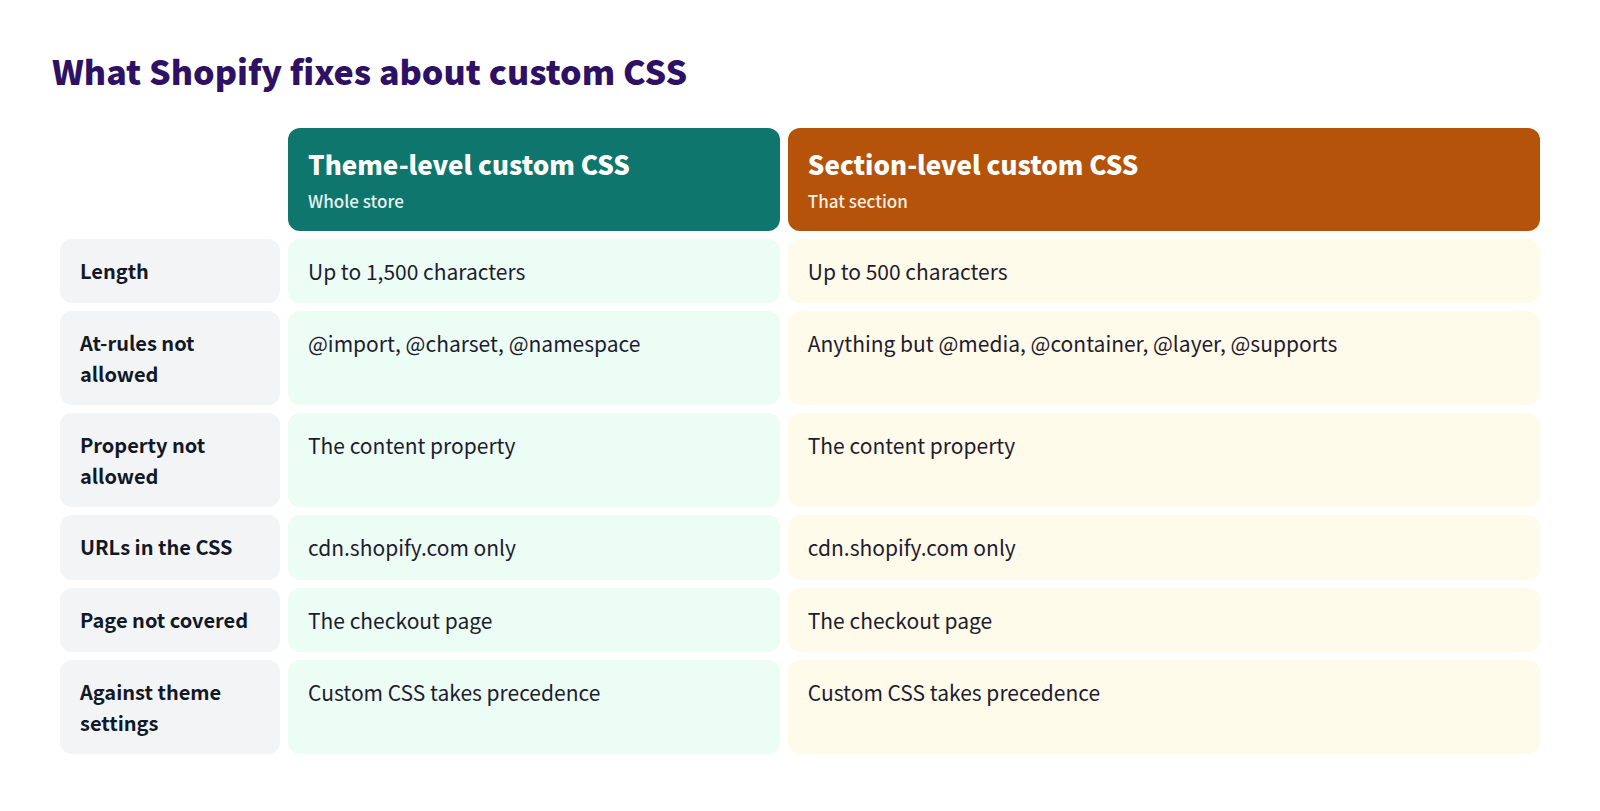
The character limits bite first: 1,500 at theme level and 500 per section. Fine for recoloring a heading, not enough to rebuild an article layout. Section-level CSS also cannot target the ID or classes of the wrapping section element the theme renders.
Custom CSS also overrides your theme's built-in settings, and a theme update can stop it working. Shopify's Help Center notes that advanced theme customization is not supported.
Writing HTML in the standard editor
Shopify's standard rich text editor has an HTML view, so you can put markup directly into a post. For changing one post only, that works.
The catch is that markup can be reformatted on save, and you end up copying the same snippet into every post that needs it. The more posts you have, the more expensive every later change becomes.
Where the standard approach runs out
Summed up, Shopify's custom CSS is a tool that works at the theme or section level.
- It is a poor fit for changing one post, let alone one paragraph
- Targeting anything requires knowing your theme's class names, which means reading code
- The character limits rule out anything elaborate
- Switch themes and the class names change, so the CSS stops working
So for the specific goal of "someone who does not write code wants tidier posts," custom CSS is not the shortest path.
How this works in Smart Agent Blog
Smart Agent Blog builds the body out of blocks, and styling is per block — so there are no class names to hunt down.
Pick a block with a pencil icon
In the insert menu to the right of the body, some blocks carry a pencil icon. That is Design Edit. The user guide lists four block types with it: headings, quotes, callouts and speech balloons.
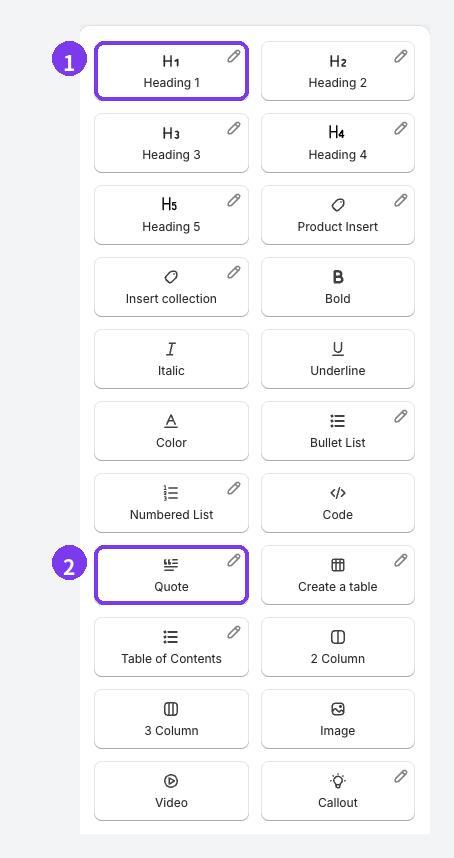
- Headings carry the structure. Make Heading 2 and Heading 3 visibly different and a long post becomes navigable
- Quotes set a customer comment apart from your own writing — awkward to do well in raw CSS
Callouts and speech balloons carry the same icon. Callouts hold conditions and warnings; balloons carry a staff remark.
Custom blocks, if you do write code
Add Custom Block at the bottom of the insert menu builds a block from your own HTML and CSS. The HTML style attribute works, JavaScript does not, and Liquid tags are not processed — they show up as plain text.
Do not paste code from a source you cannot vouch for, and test on a duplicated theme or a hidden article before publishing. Full details are in Add content to an article.
What plan you need
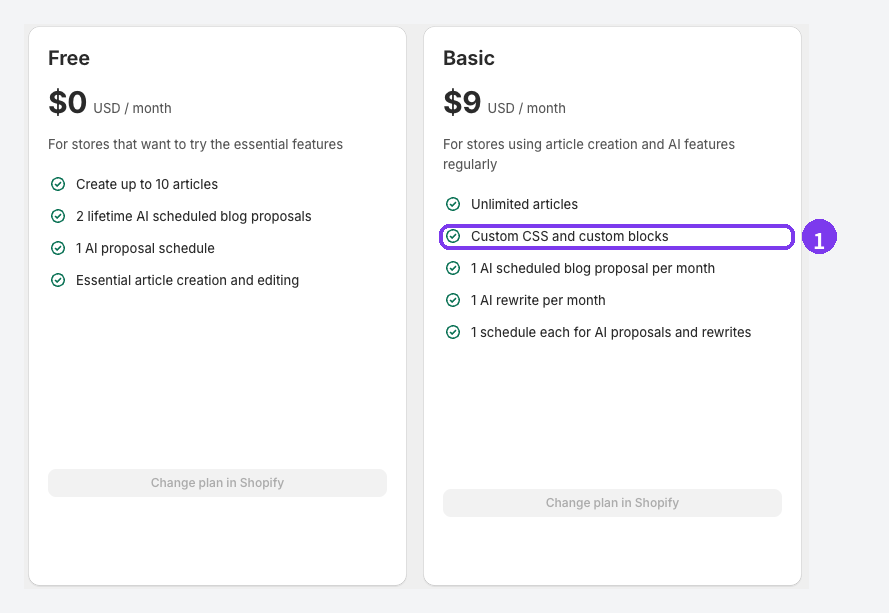
Design Edit (custom CSS) and custom blocks both require a paid plan. The free plan shows a prompt when you try to use them, though building articles and inserting blocks works on any plan. See Plans and usage limits.
What it looks like finished
A fictional store below. Putting the quote and the disclaimer in their own boxes changes how much a reader picks up in a quick scan, without a word of the copy changing.
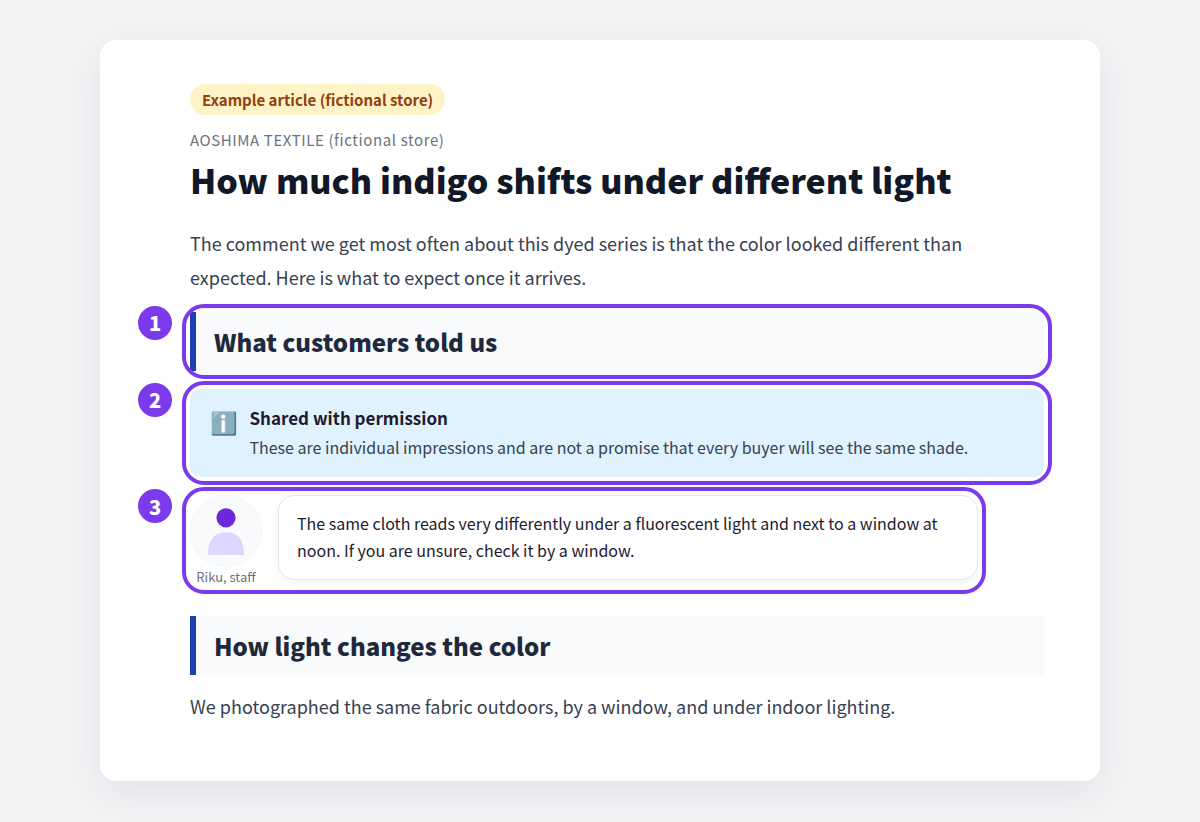
For structuring the writing itself, see Headings and tables in a Shopify blog. For how the theme layer and the article layer divide up, see Shopify blog design.
How much to take on yourself
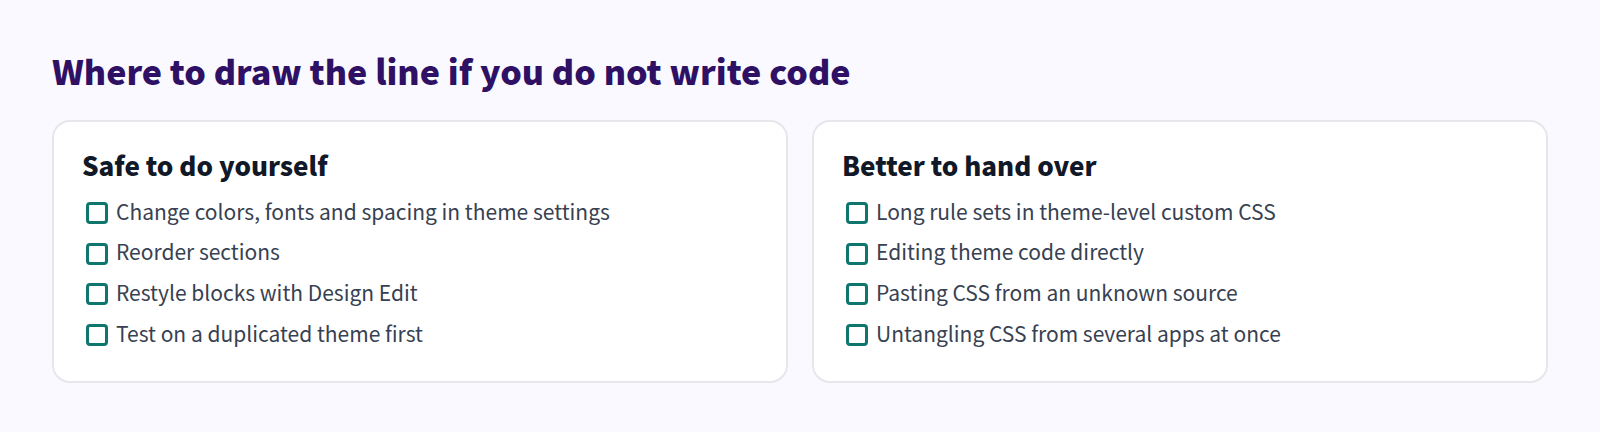
One test settles most cases: can you undo it yourself? Theme settings and block styling are reversible from the same screen. Theme code edits and long CSS are only reversible if you wrote down what you changed.
Whatever you do, duplicate the published theme first and work on the unpublished copy. The procedure is in Safely switch from your existing blog.
Common questions
What happens to my CSS if I change themes?
Custom CSS lives in the theme, so it does not follow you, and the class names it targets will be different anyway — expect to rewrite it. Block styling lives with the article, so that content survives a theme change.
Can CSS build me a table of contents?
No. CSS styles what already exists. The standard editor has no automatic table of contents, so you either hand-build anchor links in the HTML view or use a block that generates one. Adding a table of contents to Shopify blog posts compares the options.
Will installing an app break the CSS on my existing posts?
Adding a section changes how the article body is rendered, so custom CSS may not apply the way it used to. Always open three to five representative posts on a duplicated theme before switching. Shopify blog theme compatibility walks through the check.
Summary
- CSS reaches a Shopify blog post from three places: theme settings, the section, and the blocks inside the article
- Shopify's custom CSS is capped at 1,500 characters (500 per section) and rejects several at-rules and the content property
- It is not built for changing a single post
- Smart Agent Blog's Design Edit changes block styling with no class names to look up, on a paid plan
Fix what theme settings can fix, then solve the one remaining spot inside the article with a block. That order keeps the blast radius small. For the wider picture, see What a Shopify blog app can do.