
You publish, and then you have no idea whether the post is showing up in search at all. Shopify's admin doesn't report Google impressions or clicks, so this is one of the few things you have to go and look up yourself.
The answer lives in Google Search Console. It's free, and it reports impressions, clicks, CTR, and average position per URL. Shopify generates the sitemap for you, so once ownership is verified and the sitemap is submitted, data starts accumulating on its own.
Connecting Smart Agent Blog changes the direction of travel: instead of going to look, the numbers arrive by email, together with a short list of which posts to fix first. This guide covers standalone Search Console first, then the connection and what it does and doesn't change.
- How to set up Google Search Console for a Shopify store
- How to read impressions, clicks, CTR, and average position together
- The connection steps in Smart Agent Blog, and what each status badge means
- Where the connected data appears — and where it deliberately doesn't
- Which part of a post to edit once you've seen the numbers
Without search data, you can't judge a post
While preparing proposals for Smart Agent Blog in August and September 2026, we reviewed the blogs of 110 Shopify stores in Japan. About 4 in 10 (42 stores) had no posts, had stopped after a handful, or hadn't published in over a year.
One reason blogs stall is the absence of feedback. Page views tell you someone arrived. They don't tell you what position you hold in search, or whether people are seeing the result and skipping it. Without those two facts you can't decide whether to fix a post or write a different one.
Google Search Console is the only first-hand source for them, and it costs nothing.
Setting up Search Console without an app
Search Console is Google's tool, not a Shopify feature. The Shopify side of the setup is short.
The sitemap already exists
Shopify generates a sitemap automatically at example.com/sitemap.xml. It contains all products, main product images, pages, collections, and blog posts. There is nothing to build or maintain.
Verify ownership and submit
- Add the property in Google Search Console and verify ownership of the domain. Shopify documents the HTML-tag method, which you paste into
theme.liquid. - In Search Console, open Indexing > Sitemaps.
- Enter
sitemap.xmlas the filename. The full URL fills in automatically. - Select Submit.
If you run country or region-specific domains, each one has its own sitemap and each must be submitted separately. A password-protected storefront blocks Google from reading the sitemap at all, so publish first.
Reading the Performance report
Data appears over the following days and weeks. Four numbers matter:
| Metric | What it means | Worth remembering |
|---|---|---|
| Impressions | How often your page appeared in results | Rises even at low positions |
| Clicks | How often someone chose your result | Low clicks with rising impressions is still progress |
| CTR | Clicks divided by impressions | This is your title and description, scored |
| Average position | Mean position when shown | An average, so a single post moves it |
Switch to the Pages tab and all four appear per URL. That is the screen you'll use most.
Shopify's own traffic view
In your Shopify admin, Analytics includes a Sessions by landing page report showing which page each visit started on. Unlike Search Console, it covers every source — search, social, direct — so it answers a different question. Analytics > Live View shows visitors active on your online store in the past 5 minutes.
What stays manual
All of the above works today, with no app. What makes it hard to sustain:
- Shopify's admin never shows Search Console numbers, so it's always a second tool to open.
- The Pages tab lists URLs, so you match them back to post titles yourself.
- Finding a post with high impressions and a weak CTR doesn't tell you how many headings or product links it has — that's another look.
- All of it has to become a weekly habit.
The "go and look" step is where the routine usually dies.
Connecting Smart Agent Blog to Search Console
The connection flips that: the data comes to you.
Before you start
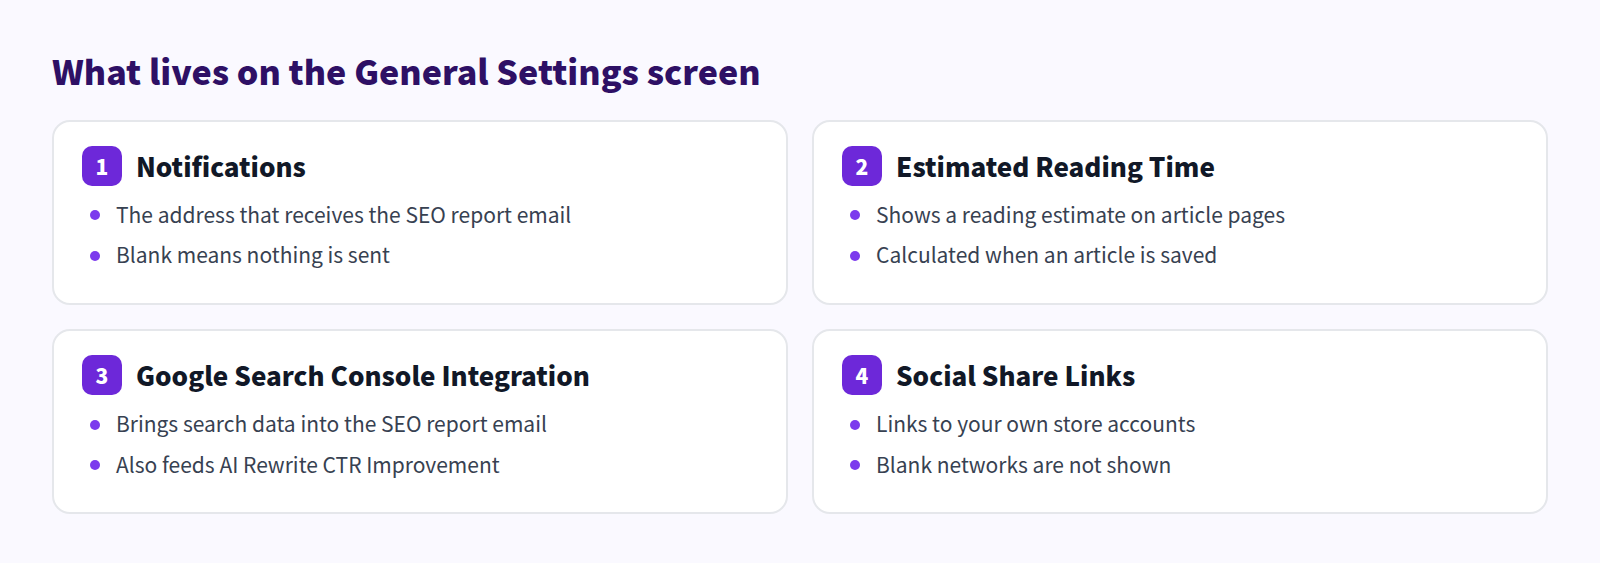
- You have a Google account that can use Google Search Console
- That account can access the property for this store
- You know which domain the store uses
Choose the account that can see this store's property, not a personal one.
The steps
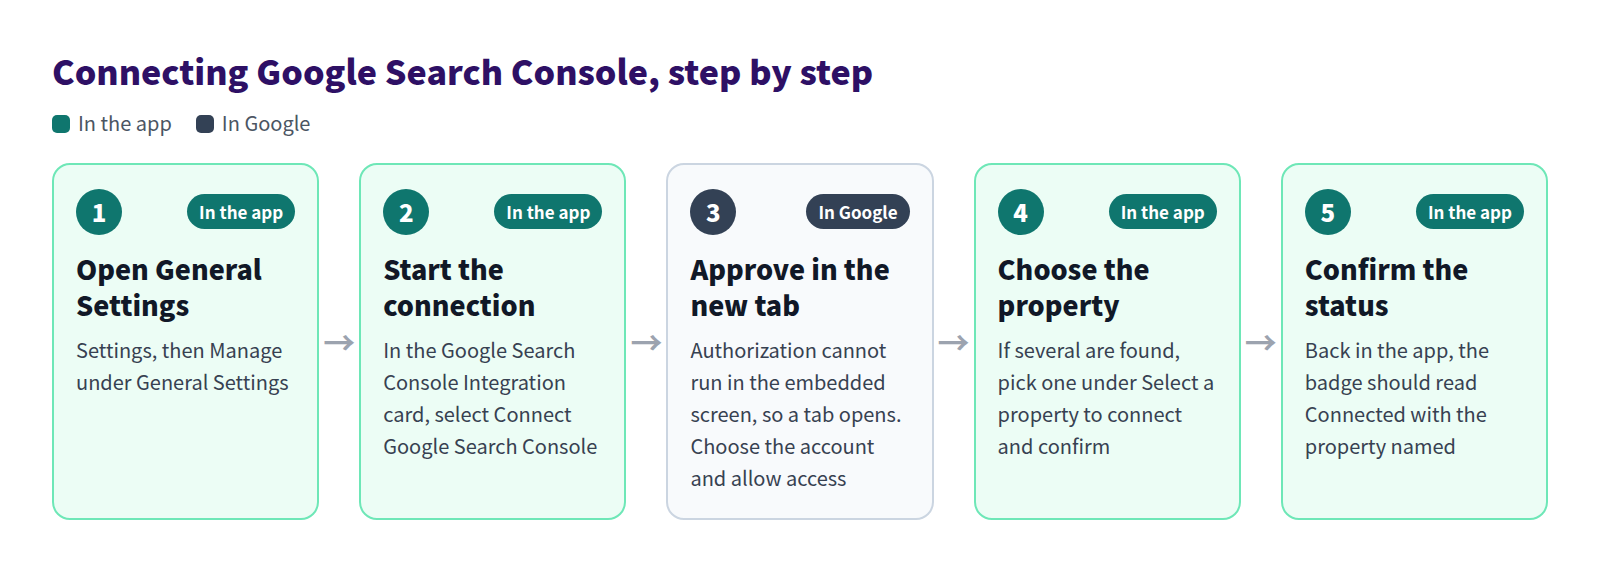
Only step three happens in Google. Authorization cannot run inside the embedded app screen, so a new browser tab opens. If you close it by accident, select the button again.
Connecting and disconnecting take effect immediately — there is nothing to save afterwards.
Reading the status badge
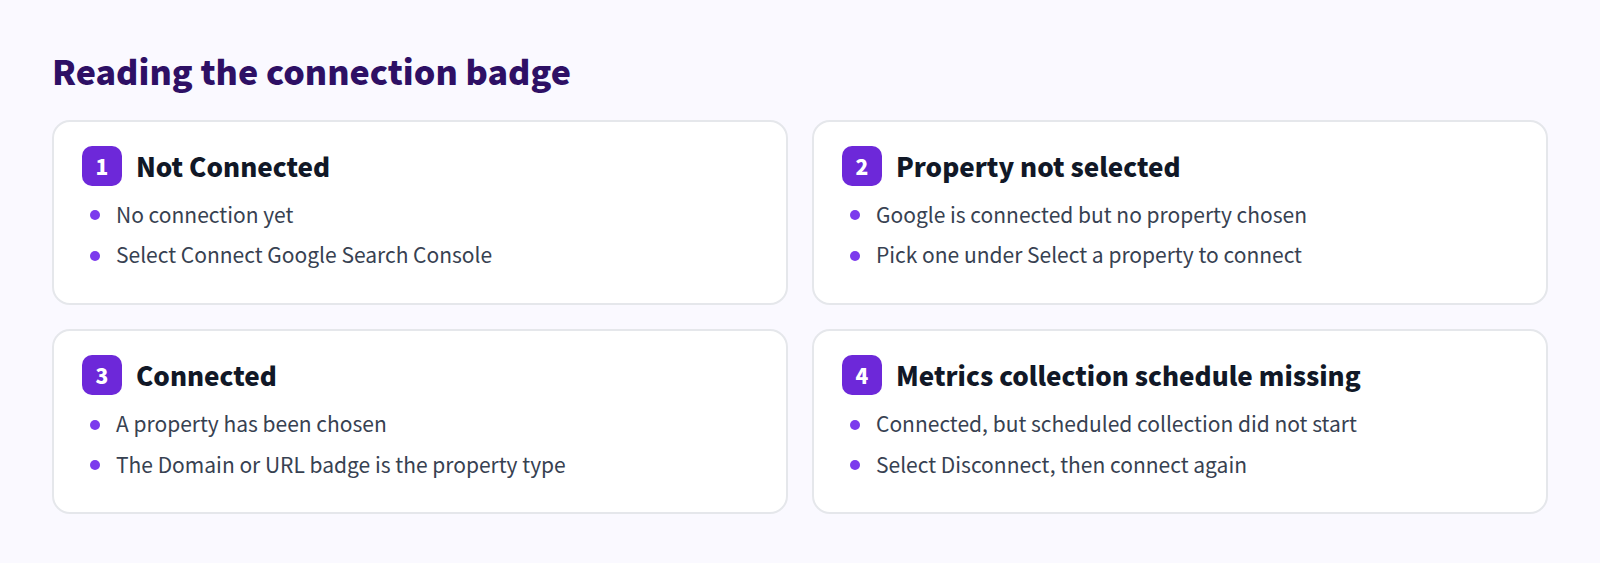
Connected with the wrong property produces numbers that don't match your store. The Domain or URL badge beside the property name is the property type as registered in Search Console. When more than one is available, Change property lets you switch.
Full instructions are in Change general settings.
Where the connected data actually goes
This is the part that surprises people. Connected Search Console data does not appear on the article analytics screen.
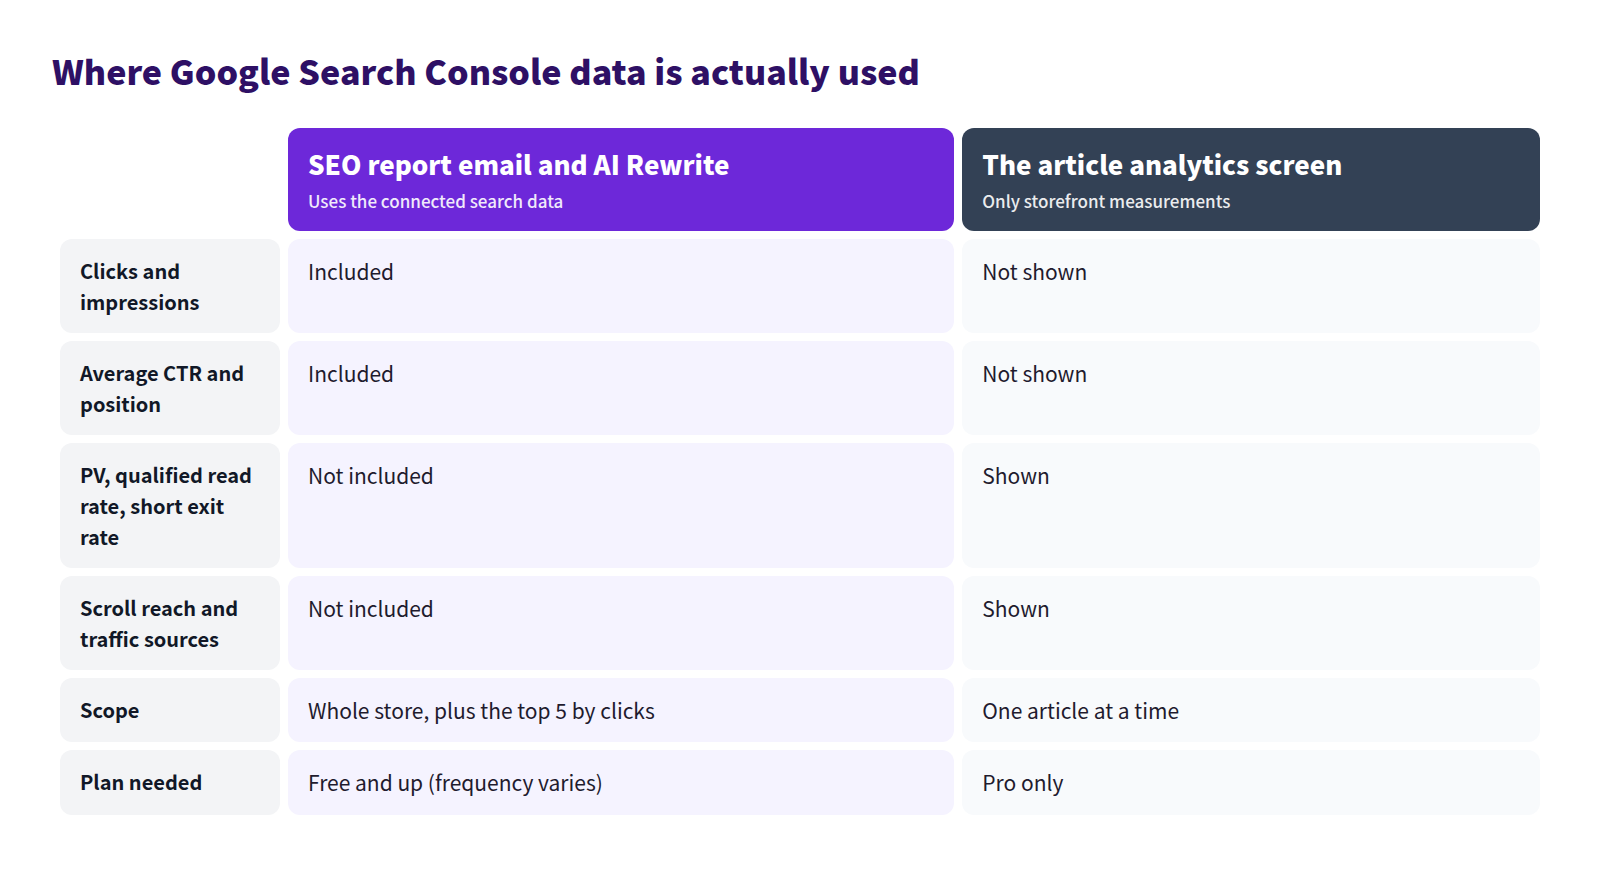
It is used in exactly two places:
- The SEO report email. Clicks, impressions, average CTR, and average position appear under Search performance, alongside Top 5 articles by clicks and AI-generated Articles to improve first. How to read it is covered in the Shopify blog SEO report guide.
- AI Rewrite's CTR Improvement strategy. Posts that appear in results but rarely get clicked are selected from this data and rewritten. Keep approval mode on and you compare before and after before anything is applied.
Article analytics covers storefront measurements only — PV, qualified read rate, short exit rate, scroll reach, traffic sources. There is also no SEO score on that screen; judgement comes from the four diagnostic scores (Reach, Reading, Action, Conversion) and goal achievement. See Review article analytics and Analytics data is not displayed.
How often the report arrives depends on your plan: monthly with a three-report total on Free, monthly with no total limit on Basic, weekly on Pro. Article analytics is a Pro feature. Current limits are in Plans and usage limits.
What to edit once you've seen the numbers
Impressions and CTR, read together, tell you where to work.
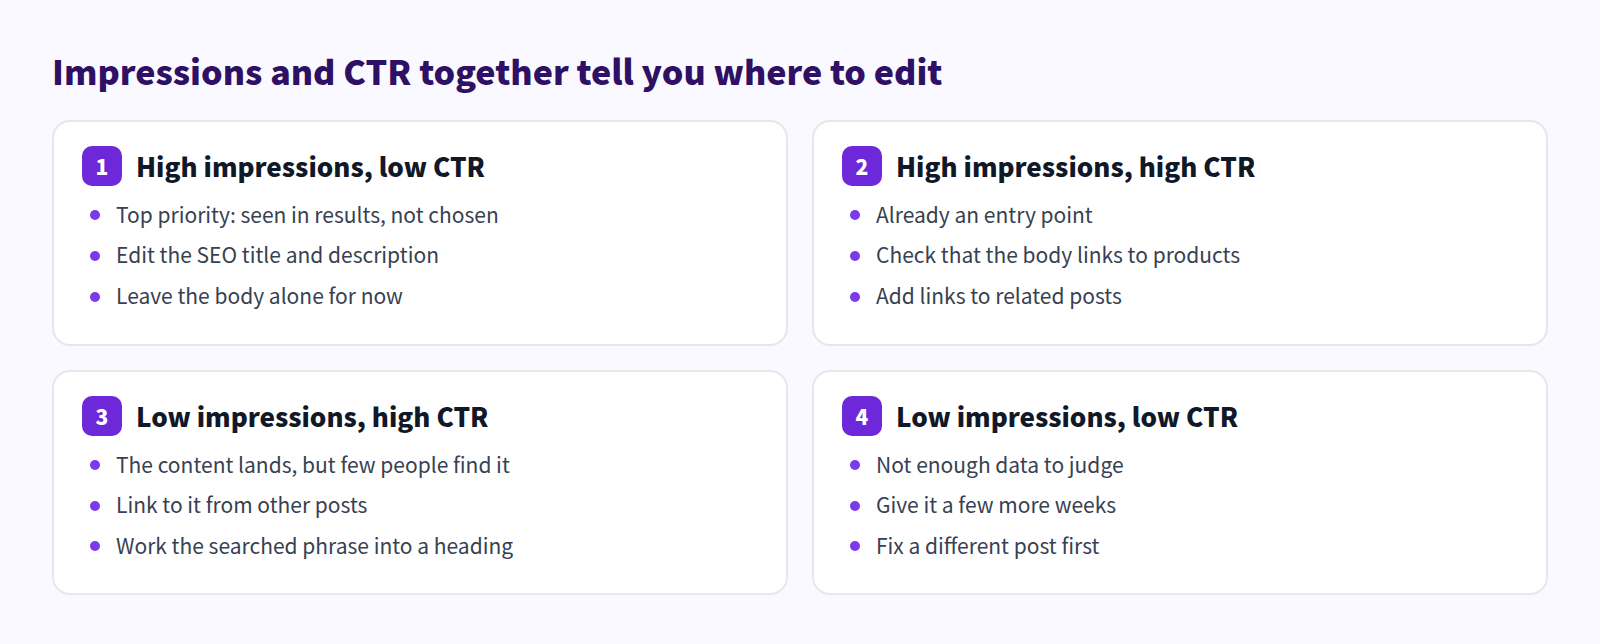
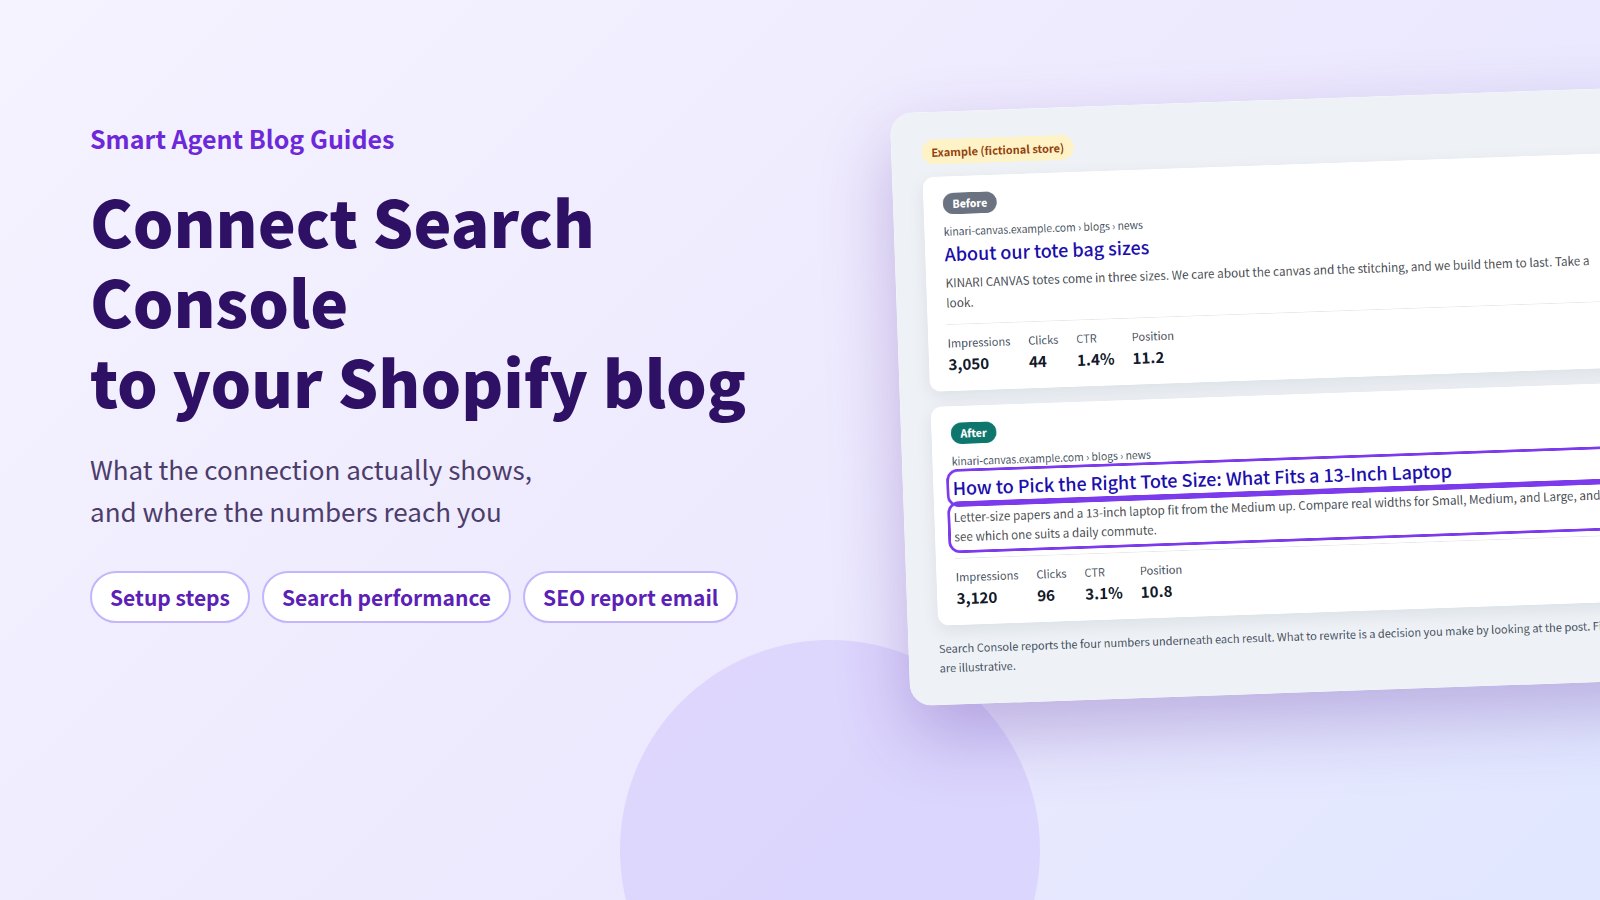
The first quadrant pays off fastest. The post is already being shown and passed over, which means the body doesn't need rewriting at all — the SEO title and description do.
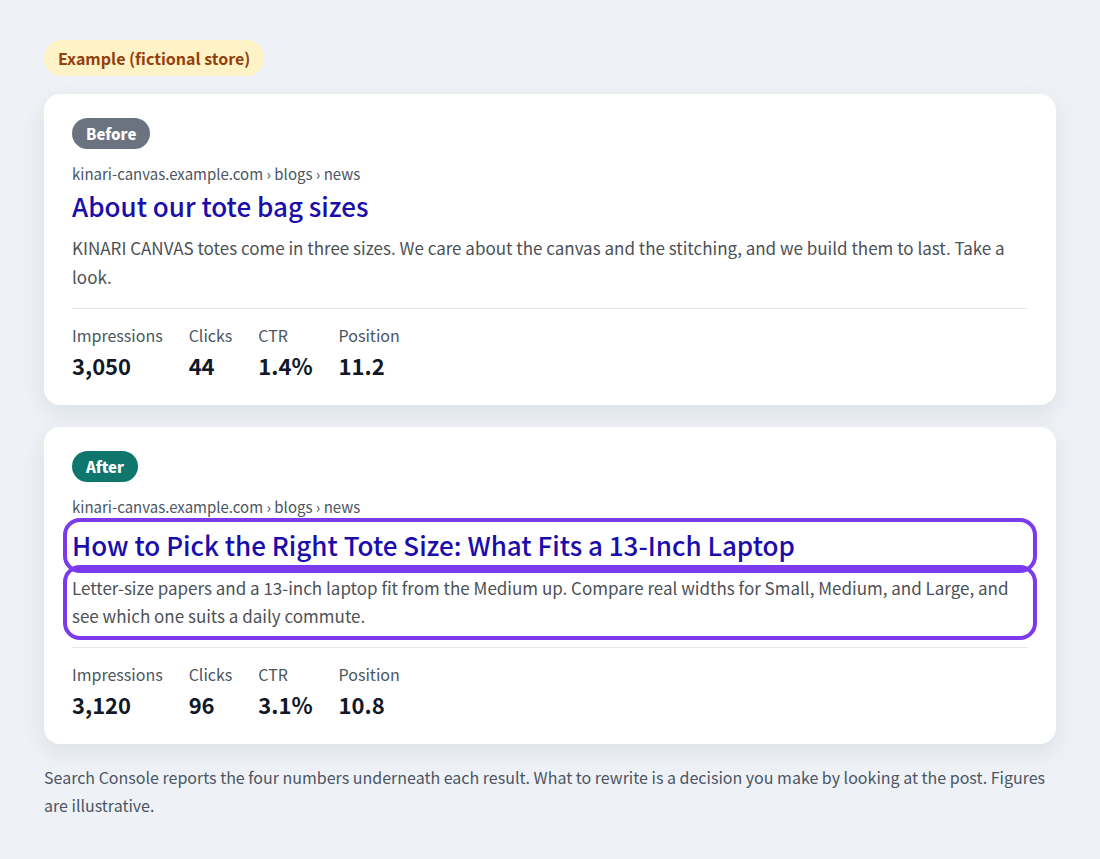
"About our tote bag sizes" doesn't answer what the searcher wants to know, which is whether their own things will fit. Naming the 13-inch laptop in the title, and answering in the first line of the description, is the whole change.
For the split between post title and SEO title, see post titles vs. SEO titles; for the description, writing meta descriptions; for the metric itself, improving click-through rate from search.
Then wait. Search results don't refresh the moment you save — give it one to two weeks before comparing.
Questions we get
I connected it, so why is search position missing from analytics?
By design. Search Console data feeds the SEO report email and AI Rewrite's CTR Improvement strategy. Article analytics only reports what is measured on your storefront.
The card says the metrics collection schedule is missing
The connection succeeded but scheduled collection didn't start. Select Disconnect, then connect again.
What happens if I disconnect?
No new Search Console data is collected. The search performance section drops out of the SEO report email, and AI Rewrite's CTR Improvement strategy can no longer pick target posts. Your articles and page-view data are unaffected.
In short
- Shopify generates the sitemap; verify ownership, submit it, and search data starts accumulating
- Judge a post on impressions, clicks, CTR, and average position together
- Connect under Settings → General Settings; you're done when the badge reads Connected with the right property
- Connected data powers the SEO report email and AI Rewrite, not the analytics screen
- Start with posts that have high impressions and a weak CTR, and edit only the SEO title and description
The wider picture is in the Shopify blog marketing guide. Connect it, then wait for the first report.