
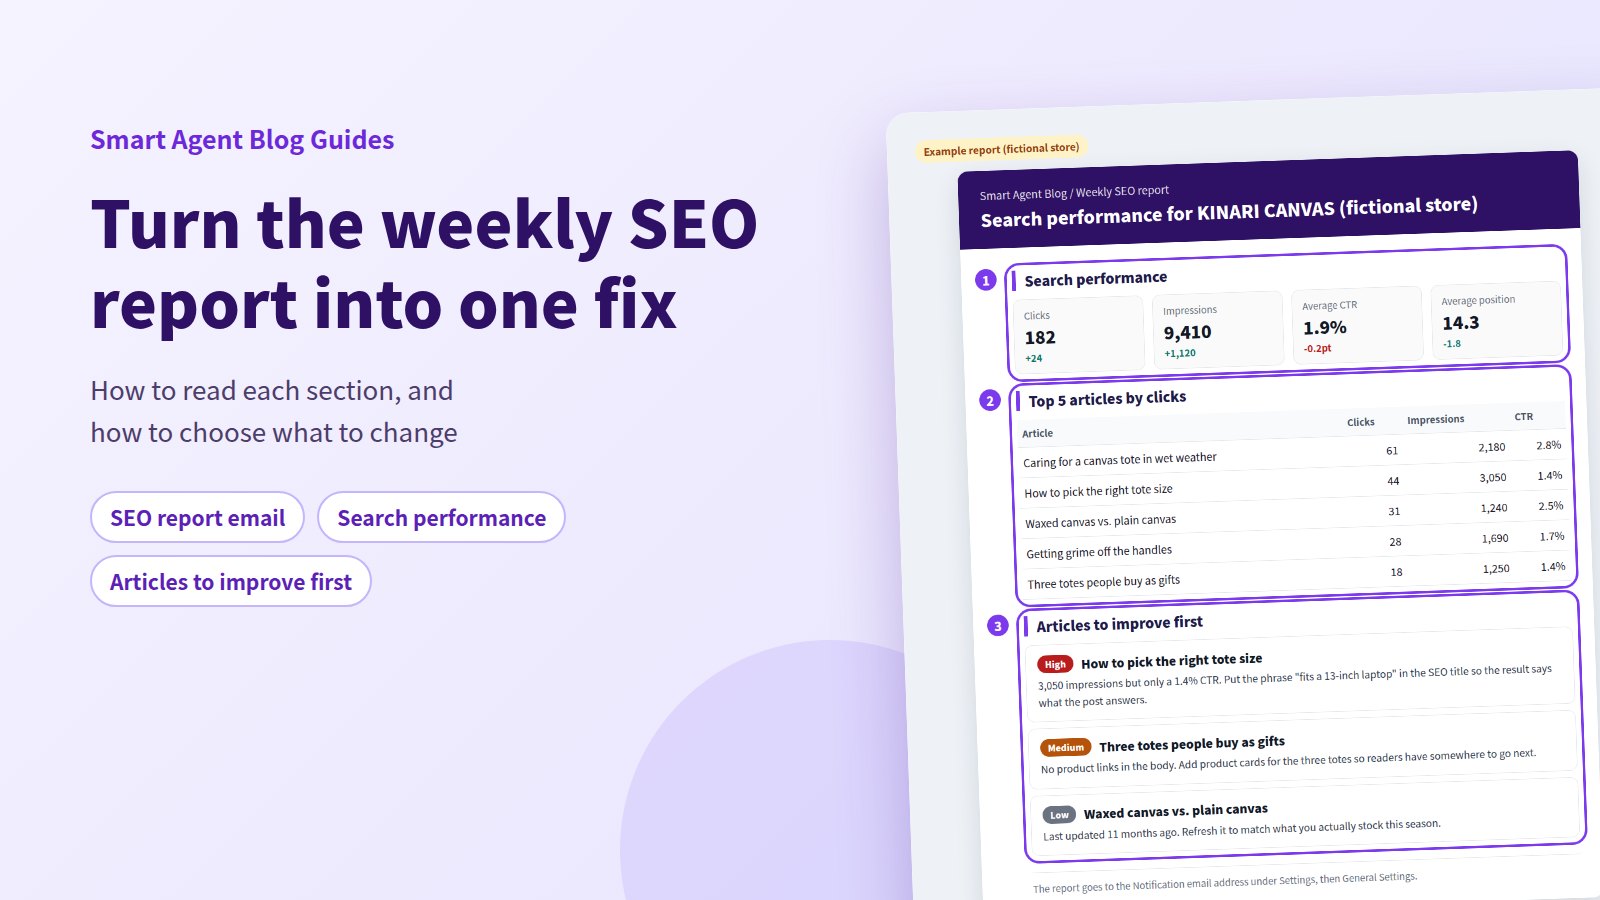
You keep publishing, but you can't tell whether search is bringing anyone in. The hardest part of blog SEO on Shopify isn't learning tactics. It's deciding which of your existing posts to fix, and where in that post to start.
Two things settle it: what Google Search Console reports (impressions, clicks, CTR, average position) and what the post itself contains. Shopify on its own gets you a long way — per-post SEO titles and descriptions, an automatic sitemap, and landing-page reporting. What it doesn't do is hand you a shortlist each week. That's what the Smart Agent Blog SEO report email is for.
This guide covers the built-in route first, then how to read the report and turn it into a single edit.
- Why blog SEO stalls once you have twenty or thirty posts
- What Shopify handles on its own, step by step
- The three sections of the SEO report email, and the order to read them
- How to pick one fix per week, with a worked example
- How report frequency changes on Free, Basic, and Pro
Blog SEO stalls at the "which post?" question
While preparing proposals for Smart Agent Blog in August and September 2026, we reviewed the blogs of 110 Shopify stores in Japan. About 4 in 10 (42 stores) had no posts, had stopped after a handful, or hadn't published in over a year.
Stores that do keep publishing hit a different wall. Once there are twenty or thirty posts, "improve everything" stops being realistic. Most SEO advice tells you what to do in general. Almost none of it tells you which of your posts to touch this week.
Posts that underperform usually fall into one of three patterns, and each one is fixed somewhere different.
| Pattern | What the numbers look like | Where to fix it |
|---|---|---|
| Not appearing in results at all | Almost no impressions | Content, headings, internal links |
| Appearing but not clicked | High impressions, low CTR | SEO title and description |
| Read but no product interest | Clicks arrive, product links go unclicked | In-body product links and CTAs |
So the first move is never "write more." It's to look at the numbers and decide which pattern you're in. Improving click-through rate from search goes deeper on the second one.
What Shopify handles on its own
Before adding anything, get the built-in pieces right. Skip this and you won't be able to tell what an app changed.
Edit how each post appears in search results
Shopify lets you set the search listing for every blog post individually.
- In your Shopify admin, go to Content > Blog posts.
- Open the post you want to edit.
- Under Search engine listing, select Edit website SEO.
- Enter a Page title. It can match the post title, or be clearer for search.
- Write a Description — one or two sentences on who the post is for and what it answers.
- Select Save.
The same fields exist for products, collections, pages, and your store's home page. For what belongs in each one, see writing meta descriptions for Shopify blog posts.
Submit your sitemap to Google Search Console
Shopify generates a sitemap automatically at example.com/sitemap.xml. It contains all products, main product images, pages, collections, and blog posts. There is nothing to build.
- Verify domain ownership in Google Search Console. Shopify documents the HTML-tag method, which you add to
theme.liquid. - In Search Console, open Indexing > Sitemaps.
- Enter
sitemap.xmlas the filename; the full URL fills in. - Select Submit.
If you run country or region-specific domains, each domain gets its own sitemap and each must be submitted separately. A password-protected storefront blocks Google from reading the sitemap at all, so remove the password first.
Check where traffic lands
In your Shopify admin, Analytics includes a Sessions by landing page report showing which page each visit started on. Blog URLs appearing there are your entry points.
Analytics > Live View shows visitors active on your online store in the past 5 minutes, alongside orders and top locations. For per-post numbers, see checking Shopify blog page views.
Shopify Magic's Generate text icon can also draft titles and body copy inside the same editor.
A 30-minute weekly routine with no app
Put together, the built-in tools support this loop:
- Open the last 28 days of Performance in Google Search Console.
- Compare impressions, clicks, CTR, and average position per page against the previous period.
- Pick one page with high impressions and a low CTR.
- Rewrite that post's SEO title and description in Shopify.
- Check the same page again next week.
If you can run that every week, you don't strictly need anything else.
Where the built-in route runs out
What stays manual is the part that quietly kills the habit:
- Nobody tells you the numbers moved — you have to go and look.
- Matching a number against the post's actual structure (headings, images, product links) is your job.
- Choosing which post to fix first is your judgement call, every week.
- The comparison takes longer with every post you publish.
What the SEO report email contains
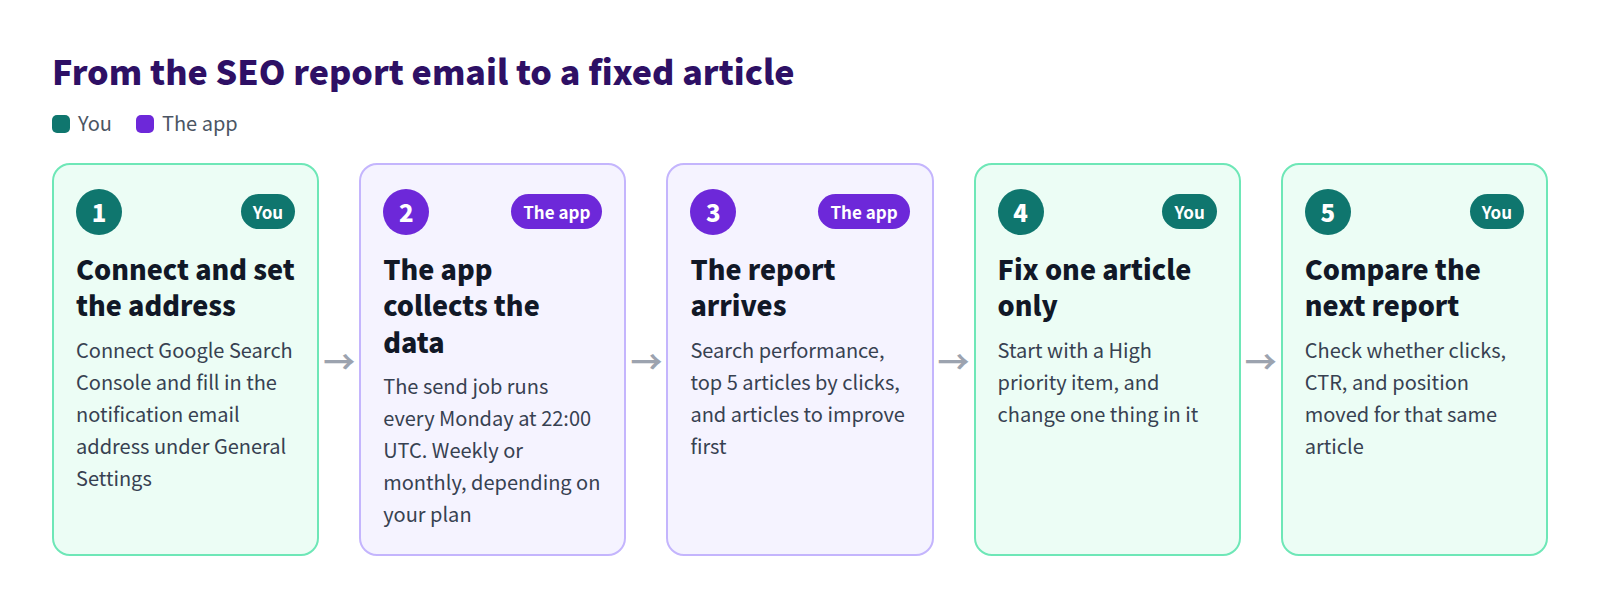
Smart Agent Blog replaces the "go and look" and "decide" steps with one email on a fixed schedule.
Two settings you need
- Notification email address — under Settings → General Settings → Notifications. Leave it blank and nothing is sent.
- Google Search Console Integration — on the same screen. Without it, the search performance section is omitted from the report.
Both are covered in Change general settings and in connecting Search Console to a Shopify blog.
Timing and plan limits
The send job runs every Monday at 22:00 UTC (Tuesday morning in Japan). How often you actually receive it depends on your plan.
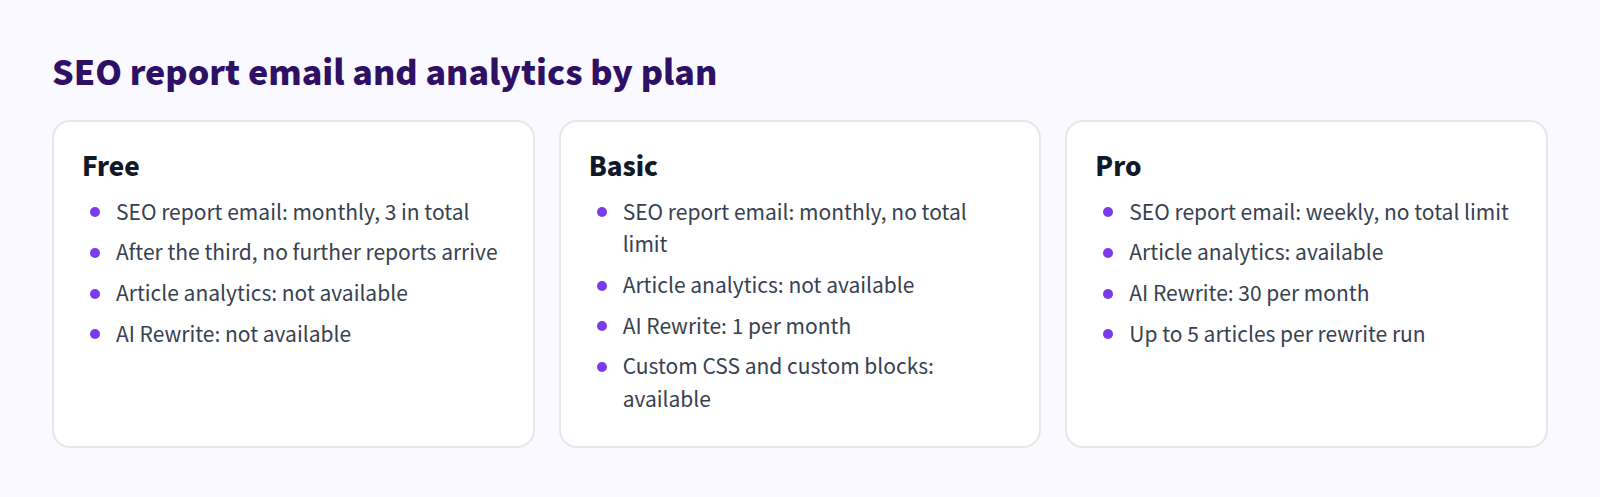
- Free: once a month, three reports in total. After the third, no more arrive.
- Basic: once a month, no total limit.
- Pro: once a week, no total limit.
A period with nothing to report is skipped, and a skipped period isn't counted. Current limits live in Plans and usage limits.
Three sections, in this order
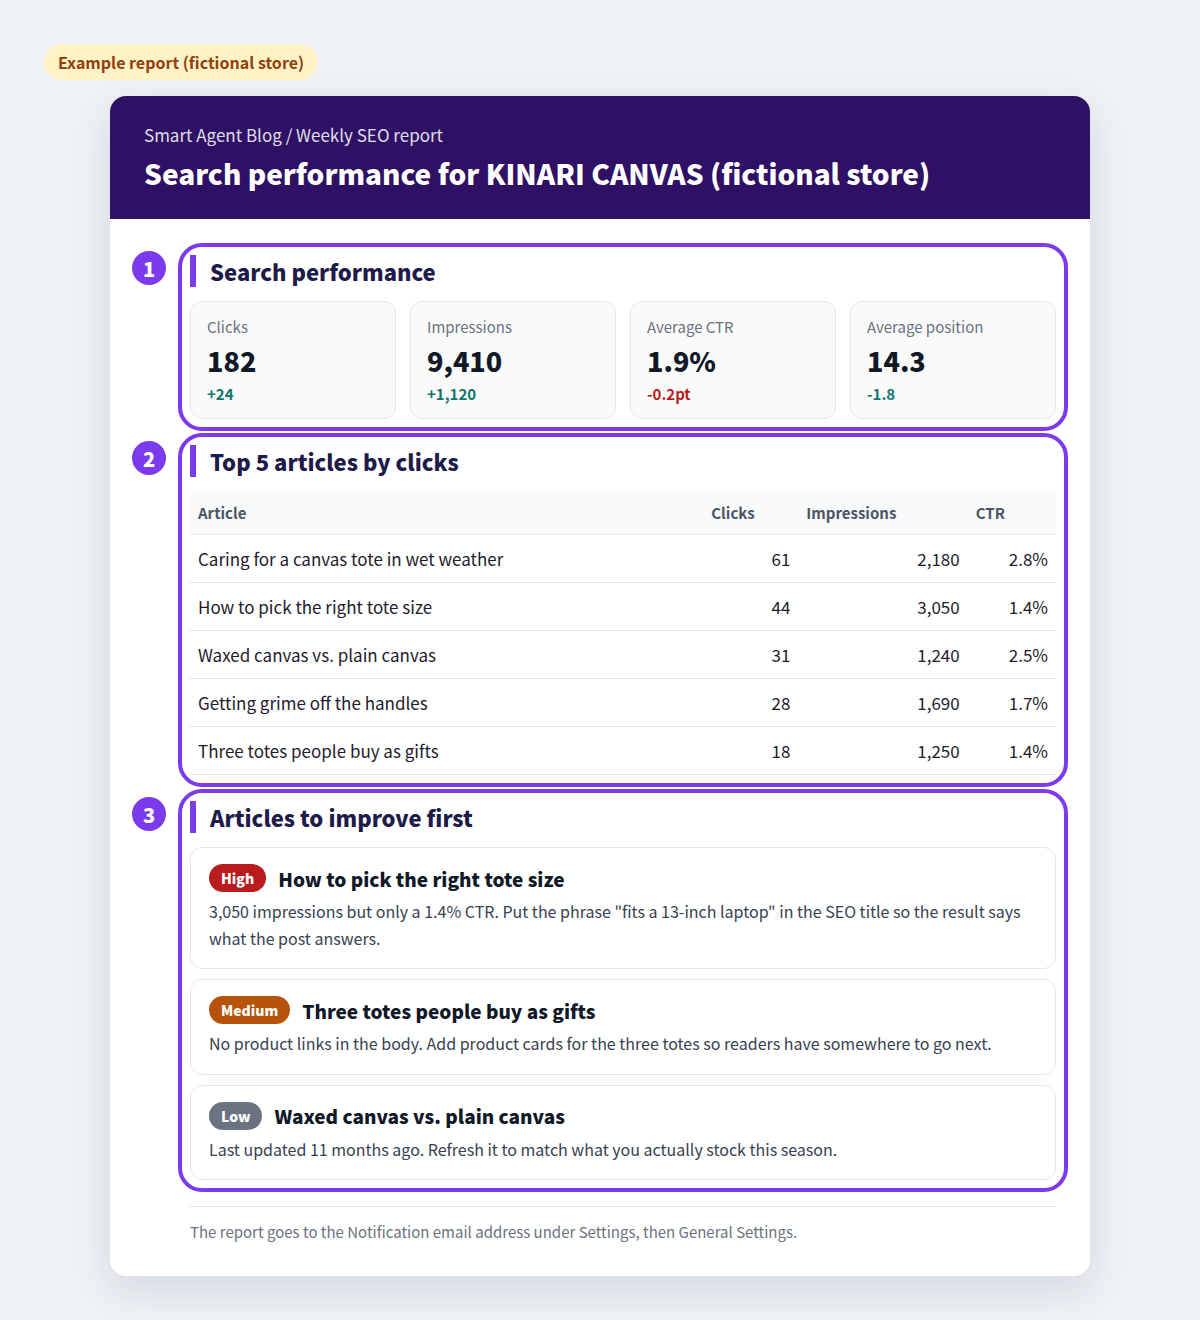
- Search performance — clicks, impressions, average CTR, and average position for the period. Store-wide movement.
- Top 5 articles by clicks — which posts are currently doing the work of bringing people in.
- Articles to improve first — AI-generated recommendations ordered by priority (High, Medium, Low). This is the part you otherwise have to reason out yourself.
Turning the report into one edit
Read top to bottom and stop at Articles to improve first. You are choosing one post, and one change inside it.
Three shapes the recommendations take
| What it says | Where you edit | Roughly |
|---|---|---|
| High impressions, weak CTR | SEO title and description | 10 minutes |
| No product links in the body | Add a product card mid-post | 15 minutes |
| Not updated in months | Refresh the facts and examples | 30 minutes |
Change one thing and stop. Change three and next week's numbers won't tell you which one worked.
What the fixed post looks like
In the example report, the High priority item was a tote sizing post: 3,050 impressions, a 1.4% CTR. Putting "fits a 13-inch laptop" into the SEO title, then tightening the opening and the product link, produces this:
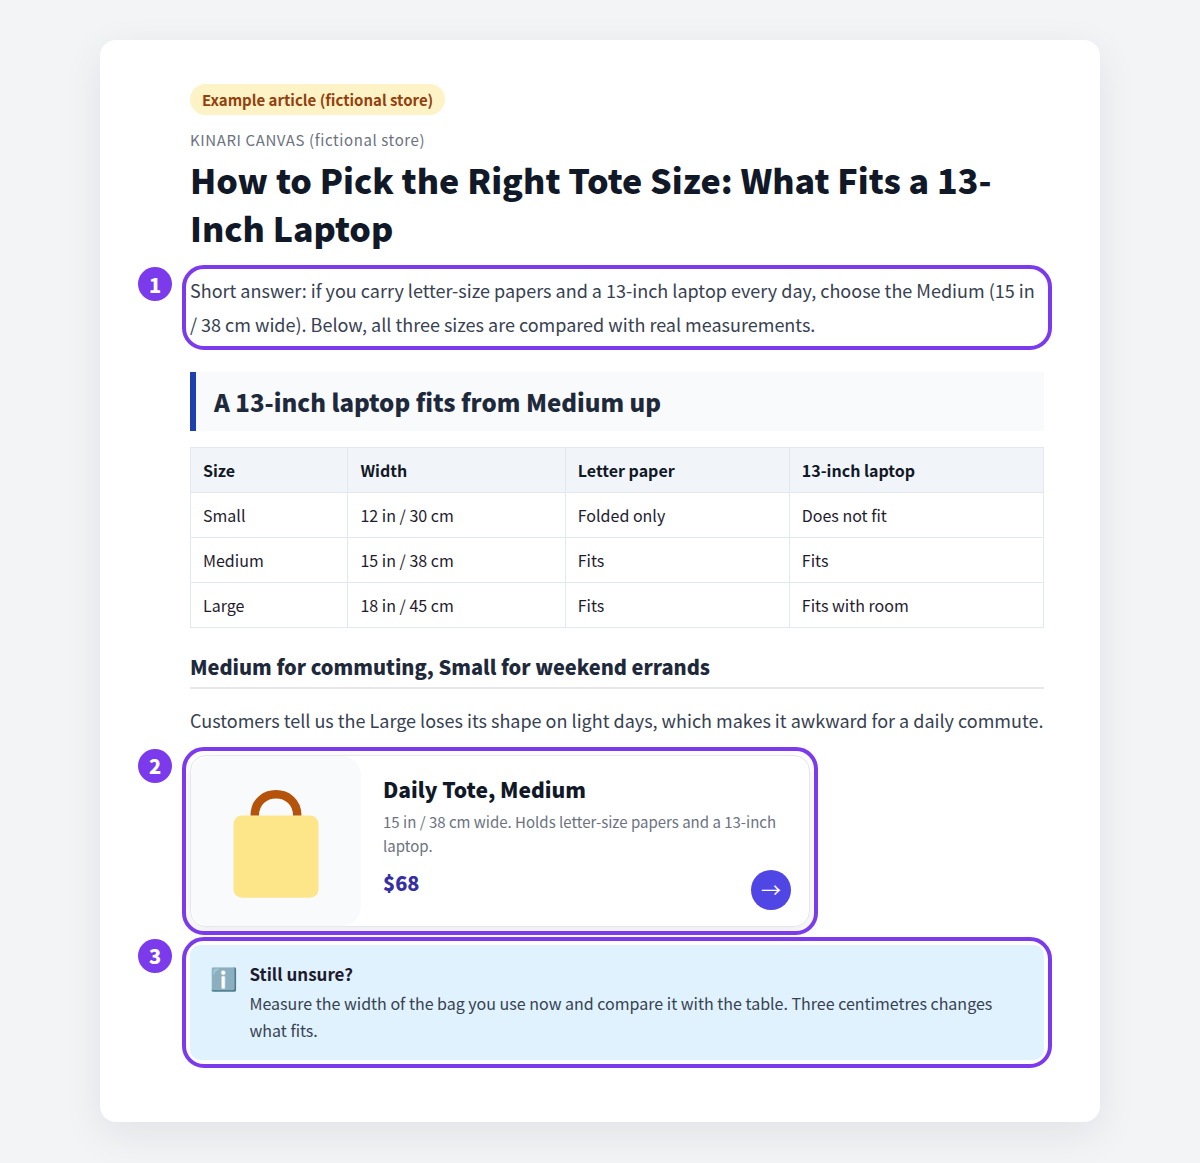
- Answer first. Someone arriving from search wants the answer, not a preamble. "Choose the Medium" belongs in the first sentence.
- Product card where the reader is convinced. Directly after the explanation beats a link stack at the very bottom.
- A short note for the common hesitation. Measuring against a bag they already own removes the last doubt.
See adding product information to Shopify blog posts for the card, and refreshing older posts with AI for the third pattern.
On Pro, read it alongside article analytics
Pro plans unlock per-article analytics, opened with View analytics at the end of a row in the article list.
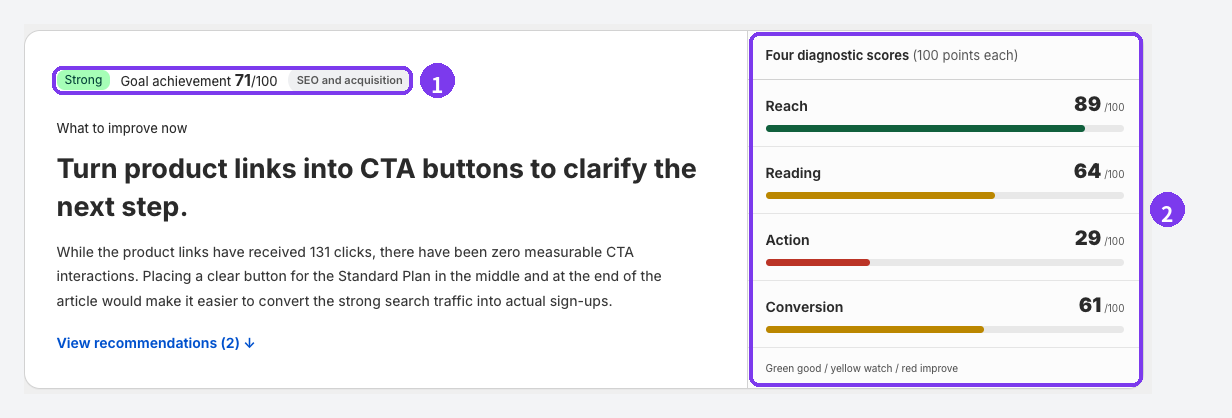
- Goal achievement — a single score out of 100, weighted for the article's purpose.
- The four diagnostic scores — Reach, Reading, Action, and Conversion, each out of 100.
Two things are worth knowing before you go looking for them:
- There is no SEO score. Judgement comes from the four diagnostic scores and goal achievement.
- Google Search Console data does not appear on the analytics screen. Clicks, impressions, CTR, and position are used by the SEO report email and by AI Rewrite's CTR Improvement strategy instead.
See Review article analytics and Analytics data is not displayed.
Turning on AI Rewrite's CTR Improvement strategy uses that same search data to pick which posts to rewrite. Keep it on approval mode and you compare before and after before anything is applied — see Use AI Rewrite.
Fifteen minutes, in this order
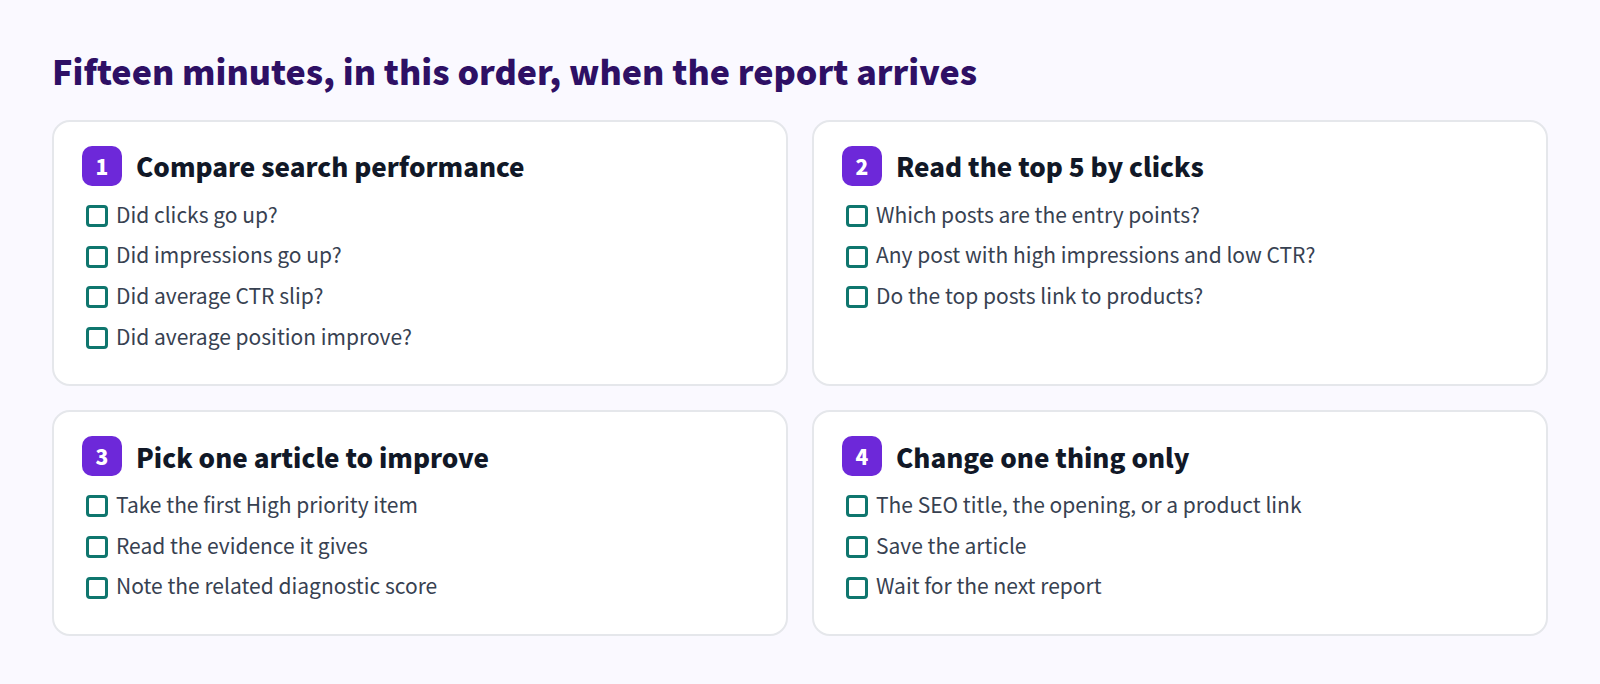
Fifteen minutes a week, repeated, beats a large cleanup twice a year. For the wider measurement picture, see measuring blog improvements and the Shopify blog marketing guide.
Questions we get
The report never arrived
Check, in order: the notification address under Settings → General Settings, whether Google Search Console shows Connected, and whether the right property is selected. Free and Basic are monthly, so confirm one hasn't already gone out this month. Periods with nothing to report are skipped.
Can I see search position inside article analytics?
No. Article analytics only covers what is measured on your storefront. Impressions, clicks, CTR, and position live in the SEO report email and in Google Search Console.
If I follow the recommendations, will rankings improve?
The recommendations are a priority order built from measured data and the structure of the post. Rankings also move with competitors and with what searchers want, so nothing here guarantees a position. Change one thing, then compare the next period — that's the part you can actually verify.
In short
- Blog SEO stalls on "which post?", not on a lack of tactics
- Shopify handles per-post SEO titles and descriptions, the sitemap, and landing-page reporting on its own
- What stays manual is going to look, and deciding what to fix first
- The SEO report email delivers search performance, the top 5 by clicks, and a prioritized improvement list — monthly on Free (3 total), monthly on Basic, weekly on Pro
- Read it in fifteen minutes, change one thing, compare next time
Start by adding a notification address and receiving the first report.