
Letting an AI write the draft is not the scary part. Publishing it is. Put a wrong product detail in front of customers and undoing it costs many times what writing it did. That instinct is correct: AI does describe features that do not exist and state things nobody verified.
What it does not mean is that you have to rewrite every draft from scratch. There are four areas worth looking at: product information, wording, readability, and images and links. Work through them in order and a draft takes 10 to 20 minutes to clear. This article covers where to find the draft and how to get it published safely.
- Why a fluent draft is the hardest kind to proofread
- How to save, preview and publish a hidden post using only the Shopify admin
- The three places a Smart Agent Blog draft shows up
- The four areas to check, with the specific items in each
- How to tell whether to fix the article or fix the settings
Reading well and being right are different things
AI prose does not trip you up. Subjects agree with verbs, paragraphs flow, nothing snags. That is exactly why factual errors slip past.
Three problems account for most of them.
- Features that do not exist — a material, a function, an accessory the product does not have
- Overclaiming — "always", "guaranteed", or a comparison with no basis
- An ending that goes nowhere — a pleasant closing line that leaves the reader with nothing to do
The third is not an error, but it means the article is not doing its job. While preparing proposals for Smart Agent Blog, we reviewed the blogs of 110 Shopify stores in Japan between August and September 2026. Of the 78 posts where we recorded structure, 27 (about 35%) had no headings at all. Readability is the part that most obviously reflects whether a person touched the article, and AI drafts are no exception.
Here is a fictional store's draft with the problems marked.
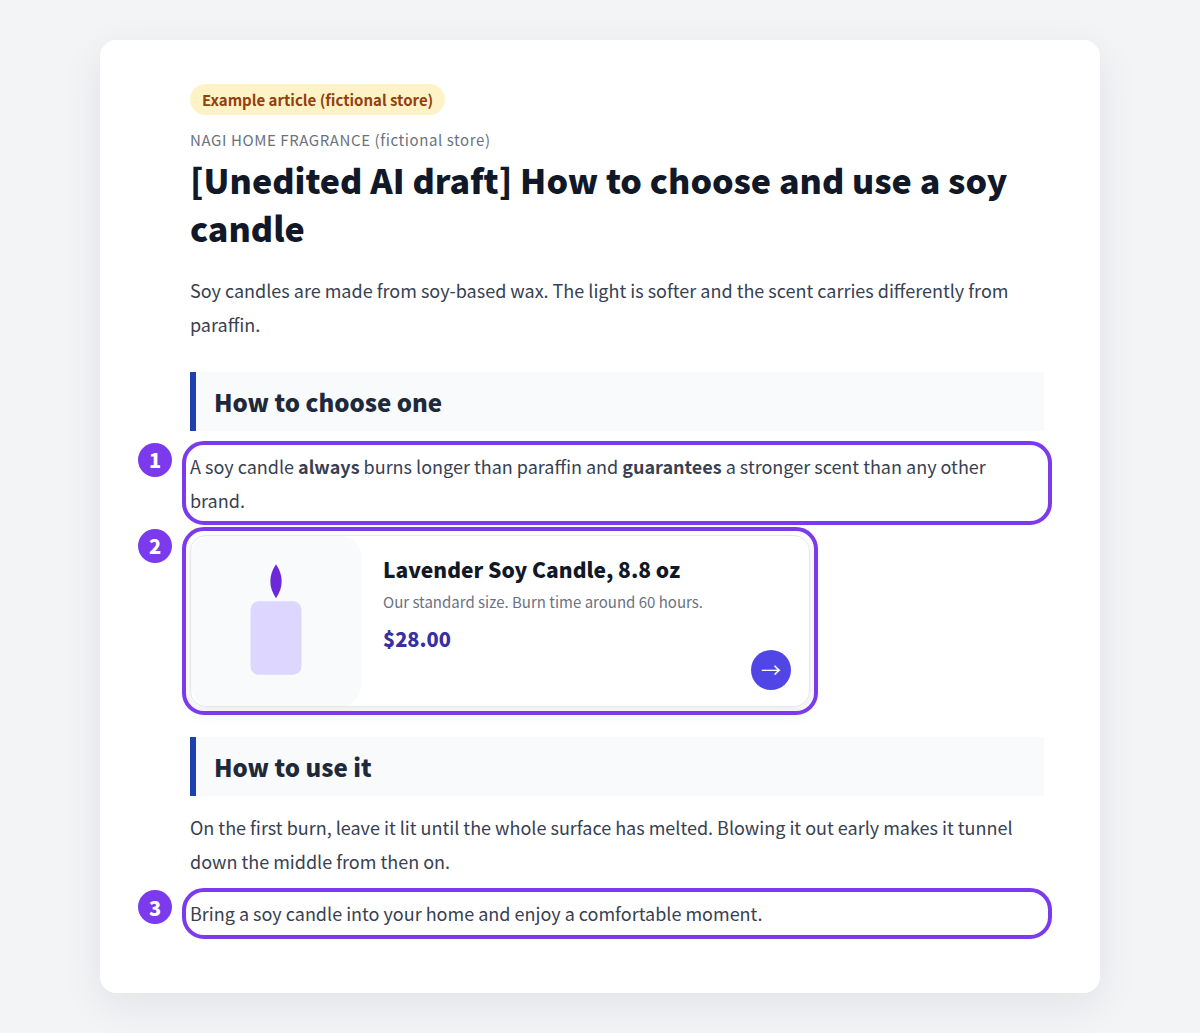
- Overclaiming and unsupported comparison. "Always", "guarantees" and "than any other brand" cannot ship. Replace them with something checkable: "burn time is around 60 hours"
- Product details. Name, size, burn time and price get compared against the product page. On screen, not from memory
- The ending. Give the reader a next move: the product page, a related article, a way to ask a question
Fix those three and the article is publishable. No rewrite required.
What Shopify can do on its own: hide, preview, publish
Whether the copy came from Shopify Magic or from an app, the pre-publish routine in the admin is the same.
Save it as hidden
- In the Shopify admin go to Content > Blog posts and open the post.
- In the Visibility section, choose Hidden.
- Select Save.
A hidden post is not visible to customers. That is the state you review in.
Check how it looks on the storefront
Reading in the admin editor and reading on the live store are different experiences, and the gap is widest on a phone, where paragraph length and image placement matter far more. Use the theme preview to see it the way a customer will.
Check how it looks in search results
Under Search engine listing preview, check three things:
- Page title — Shopify notes that titles over 70 characters may be cut off in search results
- Meta description — 320 characters is the stated guideline
- URL handle — no spaces; separate words with dashes
AI drafts often push the article title straight into the page title. It is worth confirming it still fits.
What to keep in mind with the built-in route
- You are responsible for the accuracy of what you publish. Shopify states this explicitly for generated content and asks you to review before publishing
- The blog post list gives no indication of which posts were AI-written. Tagging them yourself is the usual workaround
- Nothing notifies you that a draft exists. You open the admin and look
- There is no autosave. Make a change, then save
None of this needs an app. As a routine it is complete. What gets harder over time is remembering which posts were AI drafts in the first place. The general pre-publish checklist lives in the Shopify blog draft checklist.
Reviewing drafts in Smart Agent Blog
Decide how drafts are saved
First, decide what happens when generation finishes.

Publish Mode, at the top of Schedule Settings, offers two options.
| Publishing mode | What happens |
|---|---|
| Save as draft (manual publish) | The article is saved as Hidden. You review it and publish it yourself |
| Auto-publish at scheduled time | The article is published as soon as the scheduled generation finishes |
Always use draft mode for the first several articles. Consider auto-publishing only once you know what the output usually looks like. Choosing the day and time is covered in Shopify blog automated posting.
Find the draft
There are three ways in.
- The AI Auto Blog history on the Smart Agent Blog home screen
- Articles → AI-generated
- Articles → Hidden
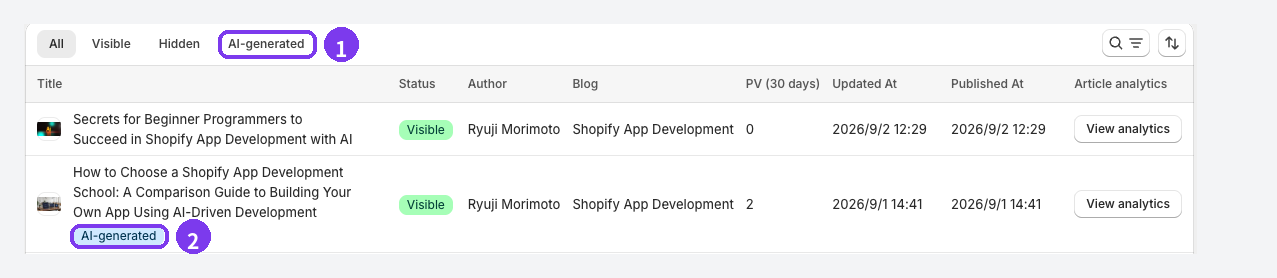
- The AI-generated tab — only articles this app's AI created. Useful for going back over older runs
- The AI-generated label — appears under the title, so AI drafts stay distinguishable even in the All tab
The list can also be filtered by status, tag, blog, author and AI-generated. Details are in Finding and opening articles.
With email notifications on, a message arrives when generation finishes. That path is covered in Shopify blog AI notifications.
Work through the four areas
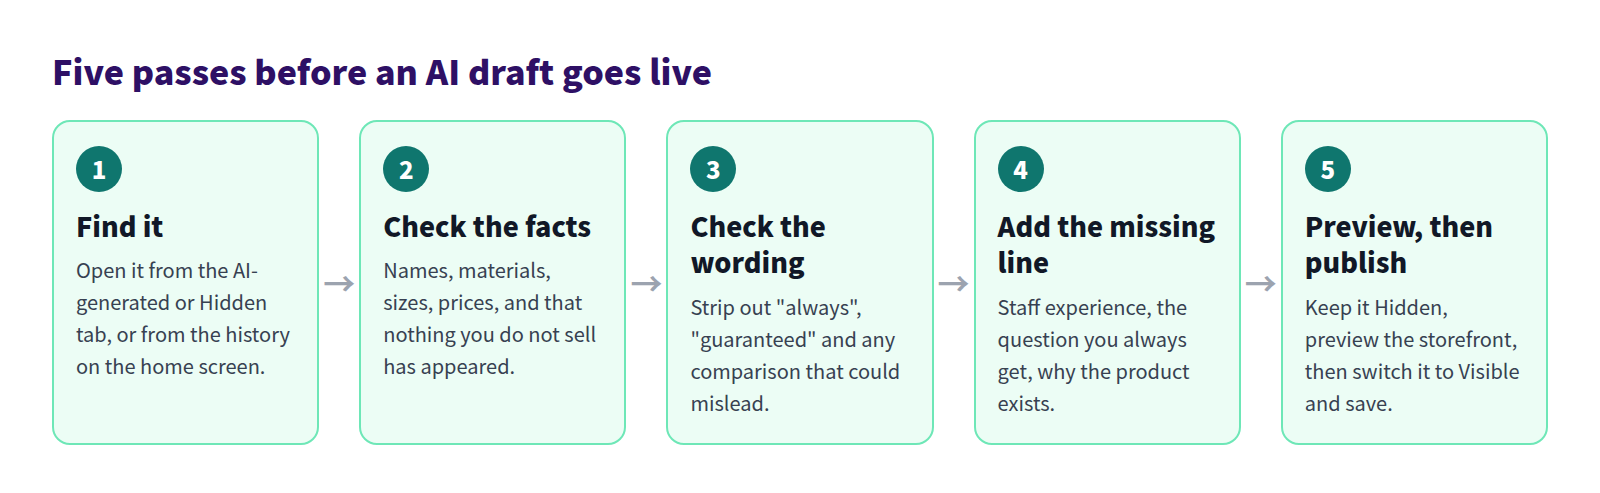
The order is facts, then wording, then readability, then images and links. Facts come first because there is no point judging the prose in a paragraph that is about to be deleted.
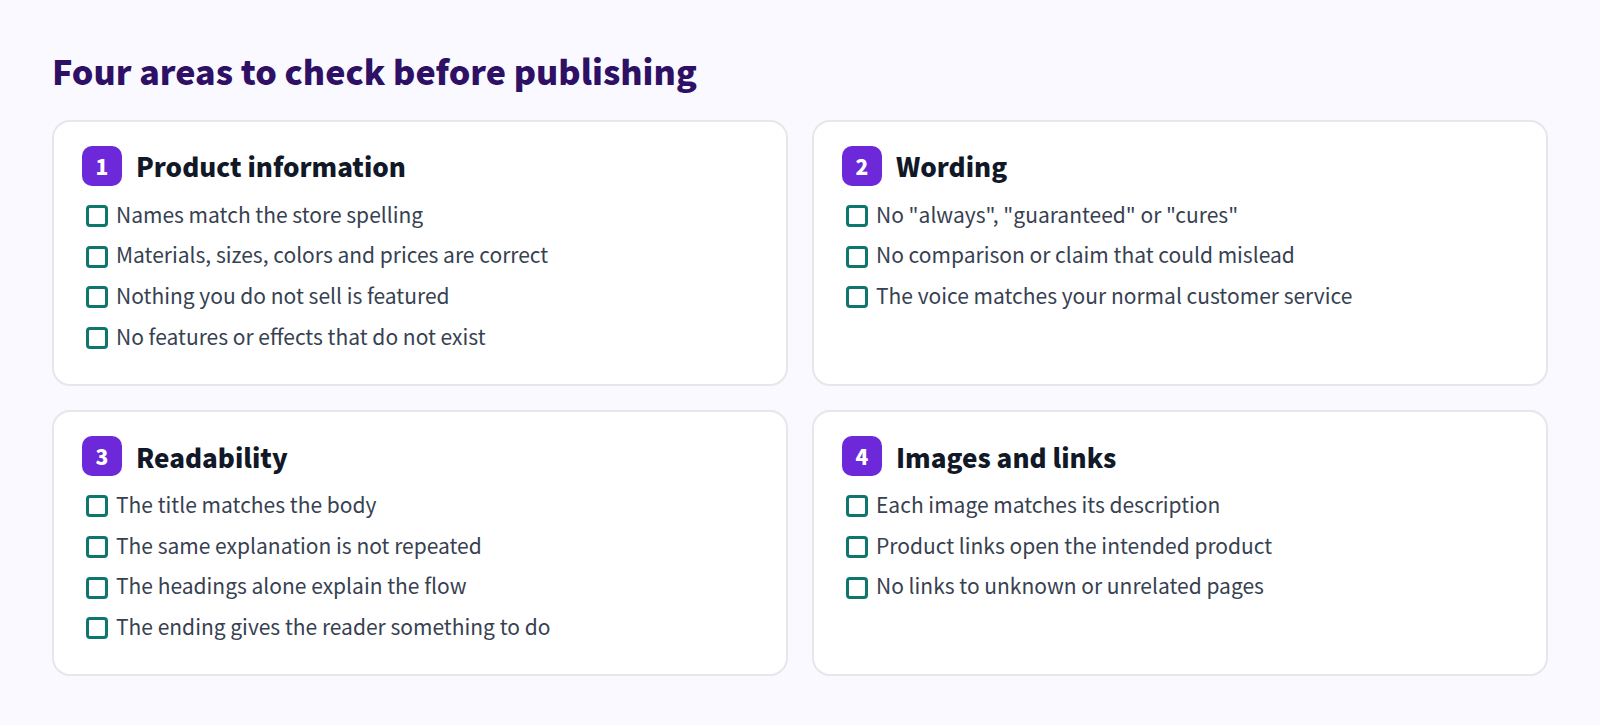
Budget 10 to 20 minutes per article. Once you are used to it, roughly half goes on facts and the rest on wording and structure.
Add the line only you can write
After the checks, add something the AI had no way to know. This is what separates a publishable article from one worth publishing.
- What a staff member noticed using it
- The question customers keep asking, and the answer
- Why the product was made, or why you chose to stock it
One per article is enough. Do it every week and the whole blog starts sounding like your store.
Preview, then publish
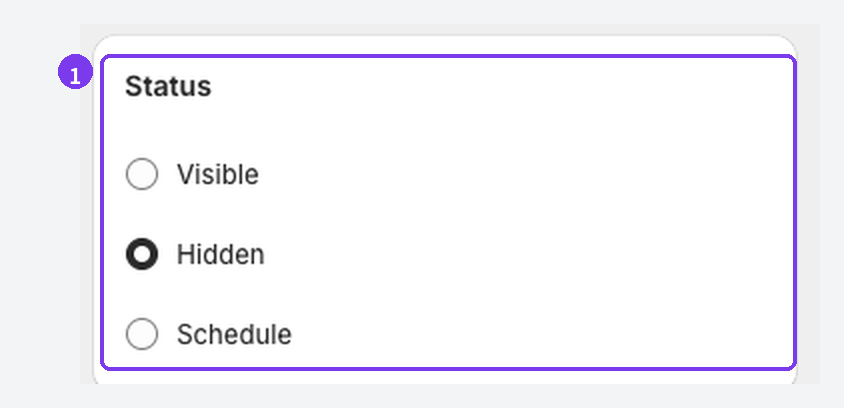
- Save your corrections. There is no autosave — leave the page without saving and the edits are gone
- Keep it on Hidden and use Preview to check the storefront
- Switch to Visible and select Save
- Check the live store afterwards
Publishing is covered in Publishing an article, and the full check list in Review an AI draft.
Fix the article, or fix the settings
Make the same correction twice and the problem is not in the article.
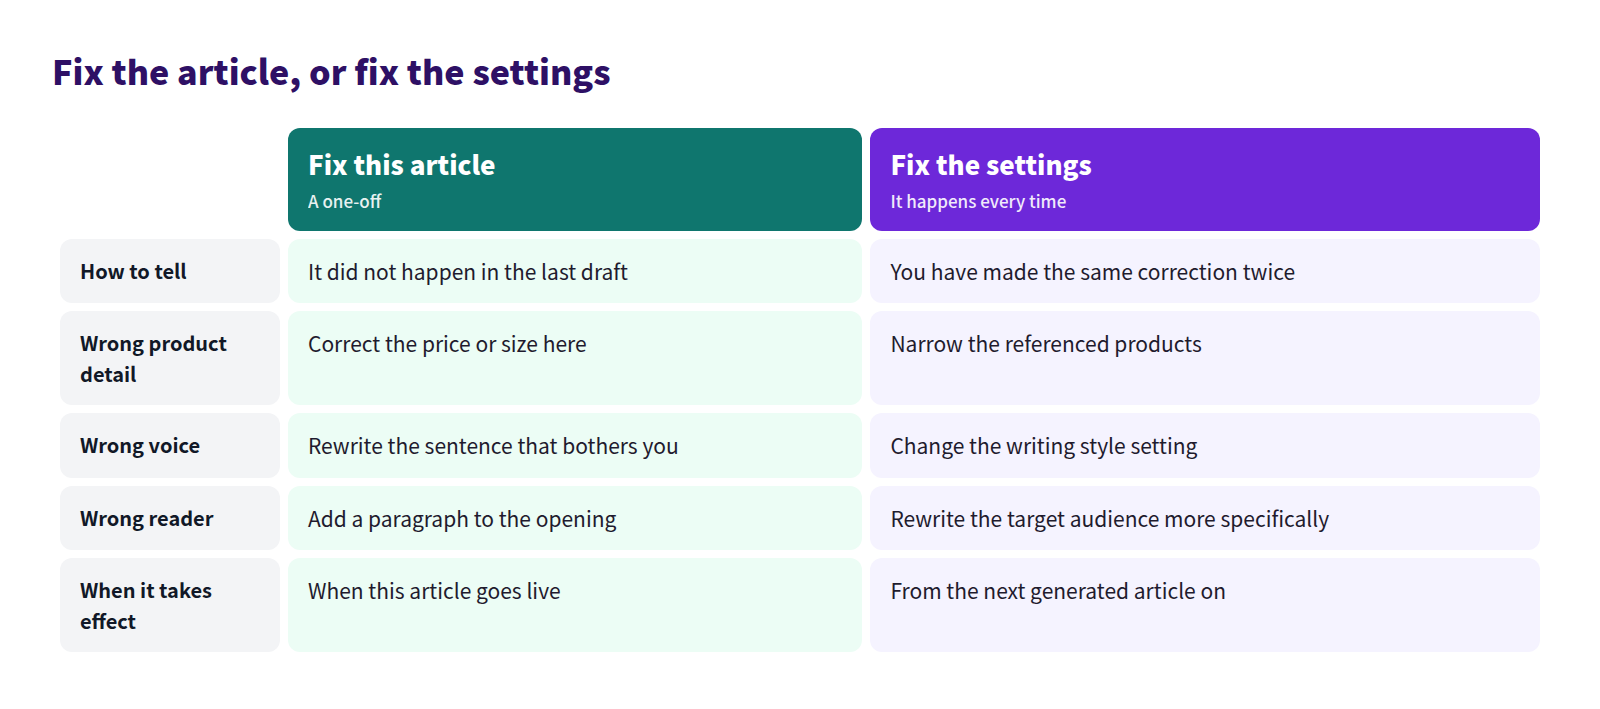
Changing a setting does nothing to the draft in front of you; it applies from the next generated article. That is exactly why it pays to go back to the settings early — every round you do makes the review shorter.
How to write those settings is covered in Shopify blog AI settings.
When the AI rewrites an existing article instead of writing a new one, the approval screen shows before and after and lets you apply only the parts you accept. That workflow is in reviewing an AI rewrite. The broader operating picture is in Shopify blogging best practices.
Frequently asked questions
How long does a review take?
Ten to 20 minutes per article. The first few take longer while you learn the quirks of your own settings, and it shortens as you feed corrections back.
How much am I allowed to rewrite?
As much as you want. Treat it as a draft. Title, body, images, products, SEO Title and SEO Description are all editable exactly as in any other article.
I published without reviewing
Set the article back to Hidden, correct it, then publish again. You can edit a live post directly, but taking it down first is safer than leaving wrong information visible while you work.
The same mistake keeps coming back
Go to the settings. Four changes cover most cases: add accurate details to the business overview, make the themes and keywords more specific, reference fewer products, and describe the target audience more clearly.
Summary
- Fluent AI prose hides factual errors better than clumsy prose does
- The Shopify admin alone can hide, preview and check the search listing before publishing
- Smart Agent Blog groups AI drafts under an AI-generated tab and labels them in the list
- Check product information, wording, readability, and images and links, in that order
- The second time you make the same correction, change the settings instead
Generate one article on draft mode and run the four checks yourself. You will know what this costs in your store.